

Bugzilla
來學習一下安裝Bugzilla ,參考
https://cloudinfrastructureservices.co.uk/how-to-install-bugzilla-bug-tracker-on-ubuntu-server-20-04-tutorial/
最近剛透過 VirtualBox 裝 Ubuntu 23.04 ,參考下面網址來達到背景模式執行
https://medium.com/@chainchainer/%E6%8A%80%E8%A7%80%E9%BB%9E-%E5%A6%82%E4%BD%95%E8%AE%93virtualbox%E4%B8%8A%E7%9A%84%E8%99%9B%E6%93%AC%E6%A9%9F%E5%9C%A8%E8%83%8C%E6%99%AF%E6%A8%A1%E5%BC%8F%E4%B8%8B%E5%9F%B7%E8%A1%8C-cd05eaa0dda1
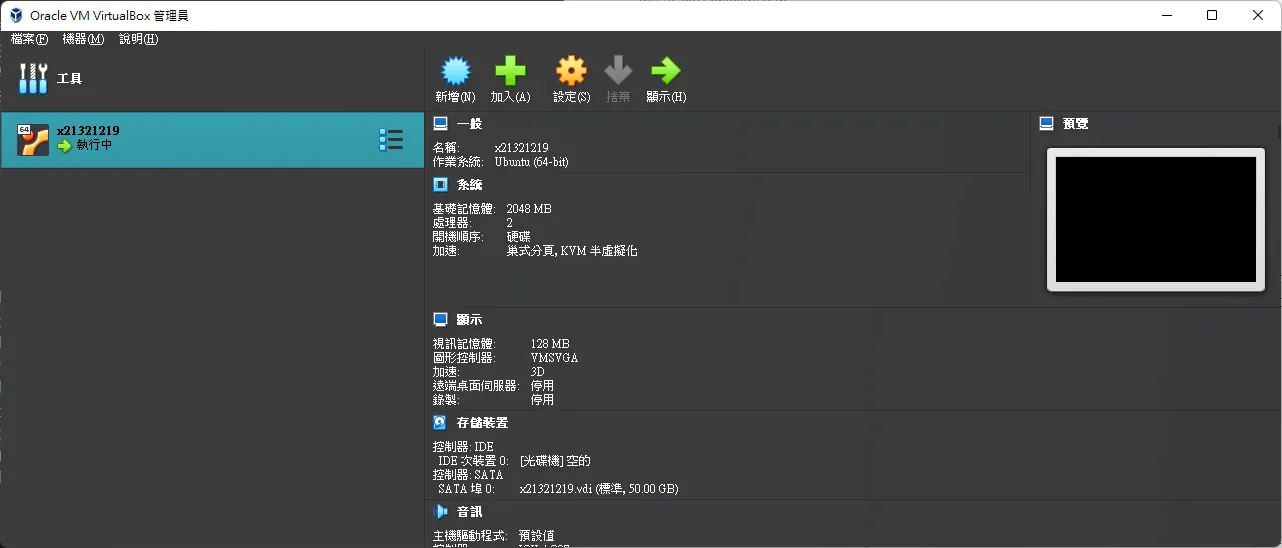 再開起來你的vm你就會看到虛擬機有執行也多了一個背景執行的按鈕
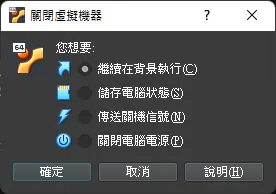
cd C:\Program Files\Oracle\VirtualBox
VBoxManage.exe startvm "x21321219" --type headless
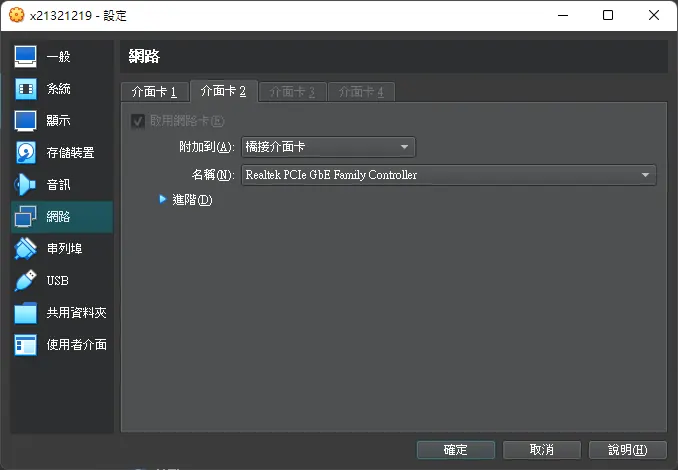
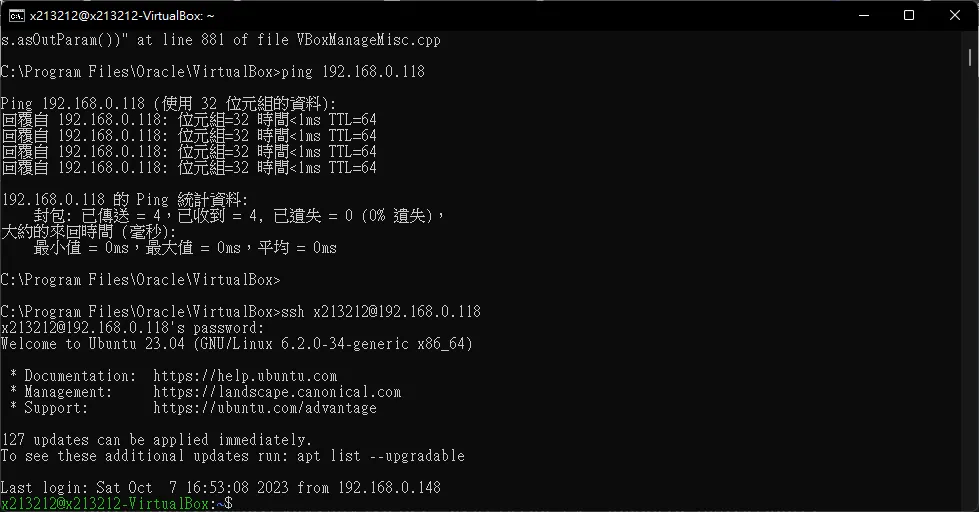
至於用vscode 連接到 virturalbox 最懶人的方式就是直接橋接一張網路卡
x213212@x213212-VirtualBox:/var/www/html/bugzilla$ ifconfig
enp0s3: flags=4163<UP,BROADCAST,RUNNING,MULTICAST>  mtu 1500
        inet 10.0.2.15  netmask 255.255.255.0  broadcast 10.0.2.255
        inet6 fe80::19a1:6bc0:a13:704e  prefixlen 64  scopeid 0x20<link>
        ether 08:00:27:0d:9c:c0  txqueuelen 1000  (Ethernet)
        RX packets 105247  bytes 149919505 (149.9 MB)
        RX errors 0  dropped 0  overruns 0  frame 0
        TX packets 28603  bytes 1981128 (1.9 MB)
        TX errors 0  dropped 0 overruns 0  carrier 0  collisions 0

enp0s8: flags=4163<UP,BROADCAST,RUNNING,MULTICAST>  mtu 1500
        inet 192.168.0.118  netmask 255.255.255.0  broadcast 192.168.0.255
        inet6 fe80::cc7:810a:f1ef:1d52  prefixlen 64  scopeid 0x20<link>
        inet6 fd01::4c1c:9b7e:8c4a:ea7  prefixlen 64  scopeid 0x0<global>
        inet6 fd01::aeb3:db58:d634:9501  prefixlen 64  scopeid 0x0<global>
        inet6 fd01::b08b:64a4:8a43:b3d3  prefixlen 64  scopeid 0x0<global>
        ether 08:00:27:9f:b3:1e  txqueuelen 1000  (Ethernet)
        RX packets 462856  bytes 43748055 (43.7 MB)
        RX errors 0  dropped 118  overruns 0  frame 0
        TX packets 412062  bytes 43293771 (43.2 MB)
        TX errors 0  dropped 0 overruns 0  carrier 0  collisions 0

lo: flags=73<UP,LOOPBACK,RUNNING>  mtu 65536
        inet 127.0.0.1  netmask 255.0.0.0
        inet6 ::1  prefixlen 128  scopeid 0x10<host>
        loop  txqueuelen 1000  (Local Loopback)
        RX packets 1006897  bytes 63393809 (63.3 MB)
        RX errors 0  dropped 0  overruns 0  frame 0
        TX packets 1006897  bytes 63393809 (63.3 MB)
        TX errors 0  dropped 0 overruns 0  carrier 0  collisions 0
Install Required Dependencies
apt-get install perl libappconfig-perl libdate-calc-perl libtemplate-perl libmime-tools-perl build-essential libdatetime-timezone-perl libdatetime-perl libemail-sender-perl libemail-mime-perl libemail-mime-perl libdbi-perl libdbd-mysql-perl libcgi-pm-perl libmath-random-isaac-perl libmath-random-isaac-xs-perl libapache2-mod-perl2 libapache2-mod-perl2-dev libchart-perl libxml-perl libxml-twig-perl perlmagick libgd-graph-perl libtemplate-plugin-gd-perl libsoap-lite-perl libhtml-scrubber-perl libjson-rpc-perl libdaemon-generic-perl libtheschwartz-perl libtest-taint-perl libauthen-radius-perl libfile-slurp-perl libencode-detect-perl libmodule-build-perl libnet-ldap-perl libfile-which-perl libauthen-sasl-perl libfile-mimeinfo-perl libhtml-formattext-withlinks-perl libgd-dev graphviz sphinx-common rst2pdf libemail-address-perl libemail-reply-perl -y
Install Apache Webserver
apt-get install apache2 -y
systemctl start apache2
systemctl enable apache2
Install and Configure MariaDB Database Server
apt-get install mariadb-server mariadb-client -y
systemctl start mariadb
systemctl enable mariadb
mariadb-secure-installation
You will be asked to set a new password, remove the test database, disallow remote root login and
remove the anonymous users as shown below:

Enter current password for root (enter for none): <ENTER>
OK, successfully used password, moving on...

Change the root password? [Y/n] y
New password: <ENTER NEW PASSWORD>
Re-enter new password: <RE-ENTER NEW PASSWORD>

Remove anonymous users? [Y/n] y
Disallow root login remotely? [Y/n] y
Remove test database and access to it? [Y/n] y
Reload privilege tables now? [Y/n] y
Add Bugzilla Table
mysql -u root -p
CREATE DATABASE bugzilladb;
CREATE USER 'bugzillauser'@'localhost' IDENTIFIED BY 'securepassword';
GRANT ALL PRIVILEGES ON bugzilladb.* TO 'bugzillauser'@'localhost';
GRANT ALL PRIVILEGES ON bugzilladb.* TO 'bugzillauser'@'localhost';
Then edit the MariaDB configuration file and tweak some settings:
vim /etc/mysql/mariadb.conf.d/50-server.cnf
Add the following lines inside the [mysqld] section:
max_allowed_packet=16M
ft_min_word_len=2
Save and close the file when you are done. Then, restart the MariaDB service to apply the changes:
systemctl restart mariadb
Install Bugzilla on Ubuntu 23.04
wget https://ftp.mozilla.org/pub/mozilla.org/webtools/bugzilla-5.0.6.tar.gz
mkdir /var/www/html/bugzilla
tar xf bugzilla-5.0.6.tar.gz -C /var/www/html/bugzilla --strip-components=1
chown -R www-data:www-data /var/www/html/bugzilla/
chmod -R 755  /var/www/html/bugzilla/
cd /var/www/html/bugzilla
./checksetup.pl
/usr/bin/perl install-module.pl --all
You will get the following output:
chmod 755 blib/arch/auto/DBD/SQLite/SQLite.so
Manifying 7 pod documents
  ISHIGAKI/DBD-SQLite-1.70.tar.gz
  /usr/bin/make -- OK
  ISHIGAKI/DBD-SQLite-1.70.tar.gz
  Skipping test because of notest pragma
Running make install for ISHIGAKI/DBD-SQLite-1.70.tar.gz
"/usr/bin/perl" -MExtUtils::Command::MM -e 'cp_nonempty' -- SQLite.bs blib/arch/auto/DBD/SQLite/SQLite.bs 644
Manifying 7 pod documents
Files found in blib/arch: installing files in blib/lib into architecture dependent library tree
Installing /var/www/html/bugzilla/lib/x86_64-linux-gnu-thread-multi/auto/DBD/SQLite/SQLite.so
Installing /var/www/html/bugzilla/lib/x86_64-linux-gnu-thread-multi/auto/share/dist/DBD-SQLite/sqlite3ext.h
Installing /var/www/html/bugzilla/lib/x86_64-linux-gnu-thread-multi/auto/share/dist/DBD-SQLite/sqlite3.c
Installing /var/www/html/bugzilla/lib/x86_64-linux-gnu-thread-multi/auto/share/dist/DBD-SQLite/sqlite3.h
Installing /var/www/html/bugzilla/lib/x86_64-linux-gnu-thread-multi/DBD/SQLite.pm
Installing /var/www/html/bugzilla/lib/x86_64-linux-gnu-thread-multi/DBD/SQLite/Cookbook.pod
Installing /var/www/html/bugzilla/lib/x86_64-linux-gnu-thread-multi/DBD/SQLite/VirtualTable.pm
Installing /var/www/html/bugzilla/lib/x86_64-linux-gnu-thread-multi/DBD/SQLite/GetInfo.pm
Installing /var/www/html/bugzilla/lib/x86_64-linux-gnu-thread-multi/DBD/SQLite/Fulltext_search.pod
Installing /var/www/html/bugzilla/lib/x86_64-linux-gnu-thread-multi/DBD/SQLite/Constants.pm
Installing /var/www/html/bugzilla/lib/x86_64-linux-gnu-thread-multi/DBD/SQLite/VirtualTable/PerlData.pm
Installing /var/www/html/bugzilla/lib/x86_64-linux-gnu-thread-multi/DBD/SQLite/VirtualTable/FileContent.pm
Installing /var/www/html/bugzilla/lib/man/man3/DBD::SQLite::Constants.3pm
Installing /var/www/html/bugzilla/lib/man/man3/DBD::SQLite::VirtualTable::PerlData.3pm
Installing /var/www/html/bugzilla/lib/man/man3/DBD::SQLite::VirtualTable.3pm
Installing /var/www/html/bugzilla/lib/man/man3/DBD::SQLite.3pm
Installing /var/www/html/bugzilla/lib/man/man3/DBD::SQLite::Fulltext_search.3pm
Installing /var/www/html/bugzilla/lib/man/man3/DBD::SQLite::VirtualTable::FileContent.3pm
Installing /var/www/html/bugzilla/lib/man/man3/DBD::SQLite::Cookbook.3pm
  ISHIGAKI/DBD-SQLite-1.70.tar.gz
  /usr/bin/make install  -- OK
Next, create a localconfig file and define the Bugzilla database and other settings:
nano /var/www/html/bugzilla/localconfig
Add the following lines:
$create_htaccess = 1;
$webservergroup = 'www-data';
$use_suexec = 1;
$db_driver = 'mysql';
$db_host = 'localhost';
$db_name = 'bugzilladb';
$db_user = 'bugzillauser';
$db_pass = 'securepassword';
$db_port = '3306';
Next, comment out the $var variable in Util.pm file:
sed -i 's/^.*$var =~ tr/#&/' /var/www/html/bugzilla/Bugzilla/Util.pm
Enable the required Apache modules with the following command:
a2enmod headers env rewrite expires cgi
Restart the Apache service to apply the changes:
systemctl restart apache2
Run the checksetup.pl script again to validate the database connection and to build the needed database tables and other configuration settings.
./checksetup.pl
You will be asked to set an administrator account as shown below:
Looks like we don't have an administrator set up yet. Either this is your first time using Bugzilla, or your administrator's privileges might have accidentally been deleted.
king closed bug statuses as such...
Creating default classification 'Unclassified'...
Setting up foreign keys...
Setting up the default status workflow...
Creating default groups...
Setting up user preferences...

Looks like we don't have an administrator set up yet. Either this is
your first time using Bugzilla, or your administrator's privileges
might have accidentally been deleted.

Enter the e-mail address of the administrator: x8795278@gmail.com
Enter the real name of the administrator: x213212
Enter a password for the administrator account:
Please retype the password to verify:
x8795278@gmail.com is now set up as an administrator.
Creating initial dummy product 'TestProduct'...

Now that you have installed Bugzilla, you should visit the 'Parameters'
page (linked in the footer of the Administrator account) to ensure it
is set up as you wish - this includes setting the 'urlbase' option to
the correct URL.
Configure Apache for Bugzilla
vim /etc/apache2/sites-available/bugzilla.conf
Add the following lines:
<VirtualHost *:80>
ServerName 192.168.0.118
DocumentRoot /var/www/html/bugzilla/

<Directory /var/www/html/bugzilla/>
AddHandler cgi-script .cgi
Options +Indexes +ExecCGI
DirectoryIndex index.cgi
AllowOverride Limit FileInfo Indexes Options AuthConfig
</Directory>

ErrorLog /var/log/apache2/bugzilla.error_log
CustomLog /var/log/apache2/bugzilla.access_log common
</VirtualHost>
Save and close the file then activate the Apache virtual host file with the following command:
a2ensite bugzilla.conf
Now restart the Apache service to apply the configuration changes:
systemctl restart apache2
You can verify the Apache running status using the following command:
systemctl status apache2
Testing service
You should get the following output:
● apache2.service - The Apache HTTP Server
     Loaded: loaded (/lib/systemd/system/apache2.service; enabled; preset: enabled)
     Active: active (running) since Sun 2023-10-08 23:24:16 CST; 10h ago
       Docs: https://httpd.apache.org/docs/2.4/
    Process: 17812 ExecStart=/usr/sbin/apachectl start (code=exited, status=0/SUCCESS)
   Main PID: 17816 (apache2)
      Tasks: 56 (limit: 2263)
     Memory: 10.7M
        CPU: 11.330s
     CGroup: /system.slice/apache2.service
             ├─17816 /usr/sbin/apache2 -k start
             ├─17817 /usr/sbin/apache2 -k start
             ├─17818 /usr/sbin/apache2 -k start
             └─17819 /usr/sbin/apache2 -k start

Oct 08 23:24:16 x213212-VirtualBox systemd[1]: Starting apache2.service - The Apache HTTP Server...
Oct 08 23:24:16 x213212-VirtualBox apachectl[17815]: AH00558: apache2: Could not reliably determine the server's fully qualified domain name, using 127.0.1.1. Set the 'ServerName' directive globally to suppress this message
Oct 08 23:24:16 x213212-VirtualBox systemd[1]: Started apache2.service - The Apache HTTP Server.
Next, verify the Bugzilla installation using the following command:
sudo /var/www/html/bugzilla/testserver.pl http://192.168.0.118/
If everything is fine, you will get the following output:
TEST-OK Webserver is running under group id in $webservergroup.
TEST-OK Got padlock picture.
TEST-OK Webserver is executing CGIs via mod_cgi.
TEST-OK Webserver is preventing fetch of http://192.168.0.118/localconfig.
TEST-WARNING Failed to run gdlib-config; can't compare GD versions.
TEST-OK GD library generated a good PNG image.
TEST-OK Chart library generated a good PNG image.
TEST-OK Template::Plugin::GD is installed.
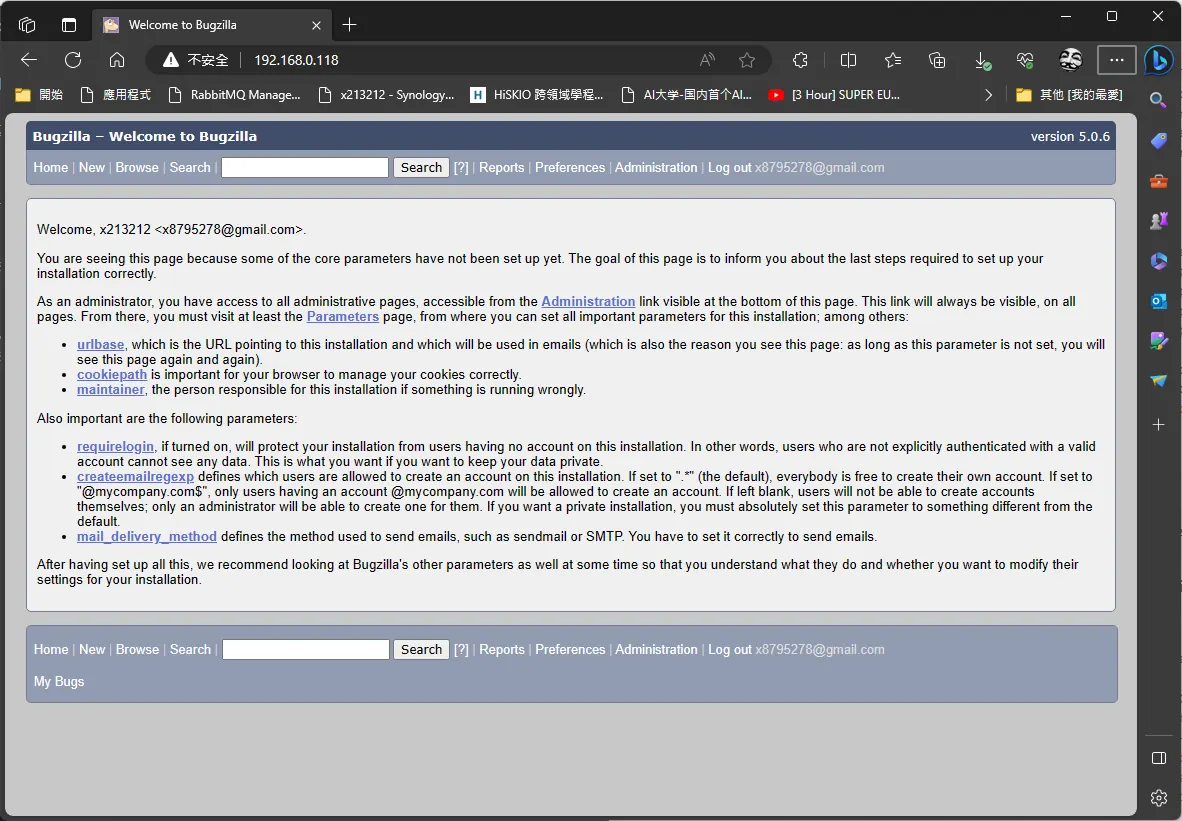
Comments