

simple llvm pass analysis
分析一個專案 andersen 可以看到專案程式裡面可以知道透過分析IR 的來額外進行andersen分析,在上程式分析的課時候學習了如何效能,這個專案可以幫助我們很快速的熟悉如何在llvm 加上一層 pass,也可以在編譯時期階段經過CMAKE產生MAKEFILE檔,透過調整參數讓我們可以調整COMPILER,整個專案運作流程可以透過llvm opt載入pass,也可在程式 runtime的時候進行呼叫 shard lib 進行分析, 課程中期末專題式分析一個 project,這可能覺得在以後工作上去理解一個程式架構有很大的幫助所以特別記錄下來,後續可能繼續整理一些 如何寫一個 gcc plugin 等等。
structure
整個專案的結構是用 google test 的框架下去做各個c unittest,分析專案的時候 https://github.com/grievejia/andersen/blob/master/unittest/AndersTest.cpp 也就是最終編譯的時候是可以在這邊編譯的
#include "NodeFactory.h"
#include "PtsSet.h"
#include "SparseBitVectorGraph.h"

#include "llvm/Analysis/CFG.h"
#include "llvm/AsmParser/Parser.h"
#include "llvm/IR/Function.h"
#include "llvm/IR/InstIterator.h"
#include "llvm/IR/LLVMContext.h"
#include "llvm/IR/Module.h"
#include "llvm/IR/PassManager.h"
#include "llvm/Pass.h"
#include "llvm/Support/ErrorHandling.h"
#include "llvm/Support/SourceMgr.h"
#include "llvm/Support/raw_ostream.h"
#include "gtest/gtest.h"

#include <memory>

using namespace llvm;

namespace {

TEST(AndersTest, PtsSetTest) {
    AndersPtsSet pSet1, pSet2;
    EXPECT_TRUE(pSet1.isEmpty());
    EXPECT_TRUE(pSet2.isEmpty());

    EXPECT_TRUE(pSet1.insert(5));
    EXPECT_TRUE(pSet2.insert(10));
    EXPECT_TRUE(pSet1.has(5));
    EXPECT_FALSE(pSet1.has(10));
    EXPECT_FALSE(pSet2.has(5));
    EXPECT_TRUE(pSet2.has(10));
    EXPECT_FALSE(pSet1.intersectWith(pSet2));

    EXPECT_TRUE(pSet1.insert(15));
    EXPECT_TRUE(pSet2.insert(15));
    EXPECT_FALSE(pSet2.insert(10));
    EXPECT_TRUE(pSet1.intersectWith(pSet2));

    EXPECT_TRUE(pSet1.unionWith(pSet2));
    EXPECT_TRUE(pSet1.contains(pSet2));
    EXPECT_EQ(pSet1.getSize(), 3u);
}

TEST(AndersTest, SparseBitVectorGraphTest) {
    SparseBitVectorGraph graph;

    auto node1 = graph.getOrInsertNode(1);
    auto node2 = graph.getOrInsertNode(2);
    auto node3 = graph.getOrInsertNode(3);
    auto node4 = graph.getOrInsertNode(4);
    auto node5 = graph.getOrInsertNode(5);
    auto node6 = graph.getOrInsertNode(6);

    EXPECT_EQ(graph.getSize(), 6u);
    EXPECT_TRUE(graph.getNodeWithIndex(0) == nullptr);
    ASSERT_TRUE(graph.getNodeWithIndex(1) != nullptr);
    ASSERT_TRUE(graph.getNodeWithIndex(2) != nullptr);
    ASSERT_TRUE(graph.getNodeWithIndex(3) != nullptr);
    ASSERT_TRUE(graph.getNodeWithIndex(4) != nullptr);
    ASSERT_TRUE(graph.getNodeWithIndex(5) != nullptr);
    ASSERT_TRUE(graph.getNodeWithIndex(6) != nullptr);
    EXPECT_TRUE(graph.getNodeWithIndex(7) == nullptr);
    EXPECT_EQ(node1->getNodeIndex(), 1u);
    EXPECT_EQ(node2->getNodeIndex(), 2u);
    EXPECT_EQ(node3->getNodeIndex(), 3u);
    EXPECT_EQ(node4->getNodeIndex(), 4u);
    EXPECT_EQ(node5->getNodeIndex(), 5u);
    EXPECT_EQ(node6->getNodeIndex(), 6u);

    //        |-> 3 \
    // 1 -> 2 |      -> 5 -> 6
    //        |-> 4 /
    graph.insertEdge(1, 2);
    graph.insertEdge(2, 3);
    graph.insertEdge(2, 4);
    graph.insertEdge(3, 5);
    graph.insertEdge(4, 5);
    graph.insertEdge(5, 6);

    EXPECT_EQ(node1->succ_getSize(), 1u);
    EXPECT_EQ(node2->succ_getSize(), 2u);
    EXPECT_EQ(node3->succ_getSize(), 1u);
    EXPECT_EQ(node4->succ_getSize(), 1u);
    EXPECT_EQ(node5->succ_getSize(), 1u);
    EXPECT_EQ(node6->succ_getSize(), 0u);

    graph.mergeEdge(4, 5);
    EXPECT_EQ(node4->succ_getSize(), 2u);
    graph.mergeEdge(5, 6);
    EXPECT_EQ(node5->succ_getSize(), 1u);
    graph.mergeEdge(3, 2);
    EXPECT_EQ(node3->succ_getSize(), 3u);
}

TEST(AndersTest, NodeMergeTest) {
    AndersNodeFactory factory;

    auto n0 = factory.createValueNode();
    auto n1 = factory.createValueNode();
    auto n2 = factory.createValueNode();
    auto n3 = factory.createValueNode();
    auto n4 = factory.createValueNode();

    factory.mergeNode(n0, n1);
    factory.mergeNode(n2, n3);
    EXPECT_EQ(factory.getMergeTarget(n0), factory.getMergeTarget(n1));
    EXPECT_EQ(factory.getMergeTarget(n2), factory.getMergeTarget(n3));

    factory.mergeNode(n4, n0);
    EXPECT_EQ(factory.getMergeTarget(n4), factory.getMergeTarget(n1));

    factory.mergeNode(n2, n4);
    EXPECT_EQ(factory.getMergeTarget(n1), factory.getMergeTarget(n2));
    EXPECT_EQ(factory.getMergeTarget(n3), factory.getMergeTarget(n4));
}

// This fixture assists in setting up the pass environments
class AndersPassTest : public testing::Test {
private:
    LLVMContext ctx;
    std::unique_ptr<Module> module;

protected:
    Module* ParseAssembly(const char* Assembly) {
        SMDiagnostic Error;
        module = parseAssemblyString(Assembly, Error, ctx);

        std::string errMsg;
        raw_string_ostream os(errMsg);
        Error.print("", os);

        if (!module) {
            // A failure here means that the test itself is buggy.
            report_fatal_error(os.str().c_str());
        }

        return module.get();
    }
};

TEST_F(AndersPassTest, NodeFactoryTest) {
    auto module = ParseAssembly("define i32 @main() {\n"
                                "bb:\n"
                                "  %x = alloca i32, align 4\n"
                                "  %y = alloca i32, align 4\n"
                                "  %z = alloca i32, align 4\n"
                                "  %w = alloca i32*, align 8\n"
                                "  ret i32 0\n"
                                "}\n");

    auto f = module->begin();
    auto bb = f->begin();
    auto itr = bb->begin();
    auto x = &*itr;
    auto y = &*++itr;
    auto z = &*++itr;
    auto w = &*++itr;

    AndersNodeFactory factory;
    auto vx = factory.createValueNode(x);
    auto vy = factory.createValueNode(y);
    auto oz = factory.createObjectNode(z);
    auto ow = factory.createObjectNode(w);

    EXPECT_EQ(x, factory.getValueForNode(vx));
    EXPECT_EQ(y, factory.getValueForNode(vy));
    EXPECT_TRUE(factory.isObjectNode(oz));
    EXPECT_TRUE(factory.isObjectNode(ow));
    EXPECT_EQ(factory.getValueNodeFor(x), vx);
    EXPECT_EQ(factory.getValueNodeFor(y), vy);
    EXPECT_EQ(factory.getValueNodeFor(z), AndersNodeFactory::InvalidIndex);
    EXPECT_EQ(factory.getValueNodeFor(w), AndersNodeFactory::InvalidIndex);
    EXPECT_EQ(factory.getObjectNodeFor(z), oz);
    EXPECT_EQ(factory.getObjectNodeFor(w), ow);
}

} // end of anonymous namespace
但是大家可以在這一層
https://github.com/grievejia/andersen/tree/master/lib
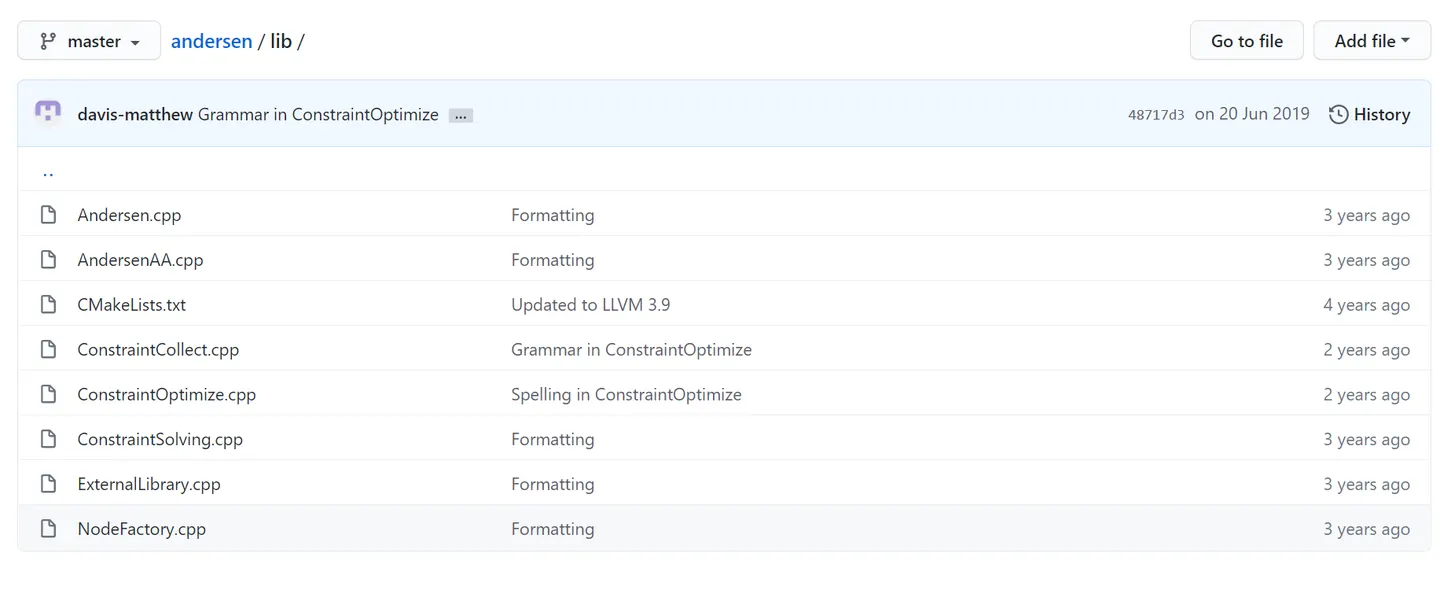 找到如何編譯一個 andersen shard lib,這邊可以簡單學一下如何在一個pass 透過下參數方式使用
clang -S -emit-llvm test.c -o test4.ll

opt-6.0 -S -load ../lib/libAndersen.so -anders-aa -dump-result ./test.ll  -o andertest.ll
install
講了那麼多,還沒構建我們的專案,在專案根目錄下我們的cmake 達到產生我們 makefile
cd <directory-you-want-to-build-this-project>

cmake <project-source-code-dir> -DCMAKE_BUILD_TYPE=<specify build type (Debug or Release)> -DBUILD_TESTS=<specify whether you want to build test files (ON or OFF)>

make
軟體分析課程指定需要其他 compiler 去進行編譯這邊使用 intel compiler
cmake ./ -DCMAKE_BUILD_TYPE=Debug -DBUILD_TESTS=ON -DCMAKE_C_COMPLER=icc -DCMAKE_CXX_COMPILER=icpc
記得在家目錄記得
export LD_LIBRARY_PATH="/home/x213212/intel/sw_dev_tools/compilers_and_libraries_2020.2.254/linux/compiler/lib/intel64_lin/:home/x213212/intel/sw_dev_tools/compilers_and_libraries_2020.2.254/linux/compiler/lib/ia32_lin/:$LD_LIBRARY_PATH"
analysis gprof
在下完根目錄cmake的話相信都會產生相對應的makefile檔案,那麼在哪裡呢
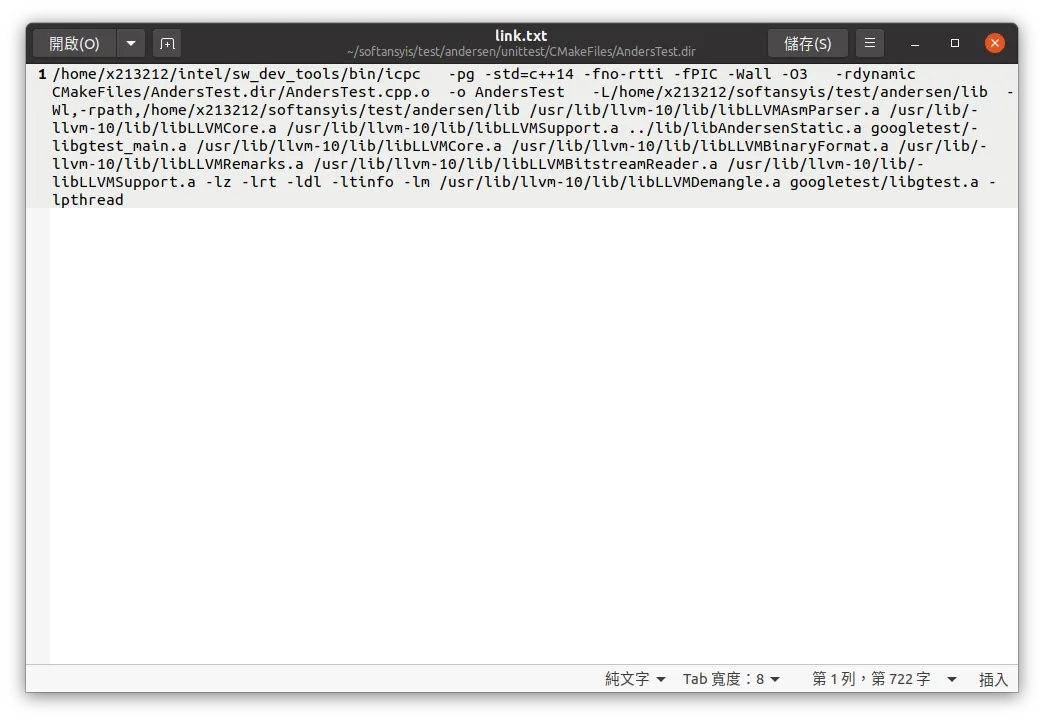
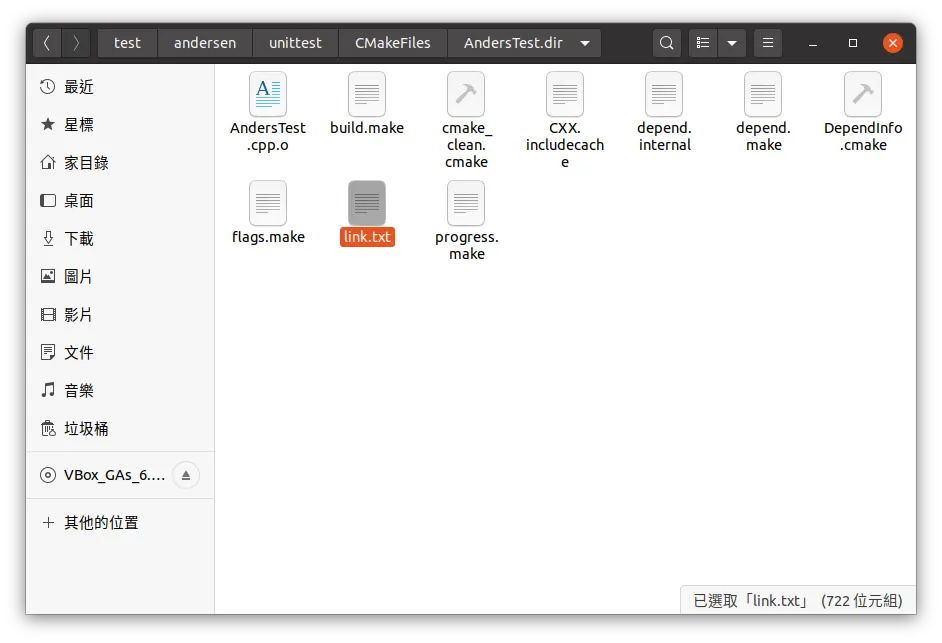 其實我們可以慢慢找目錄下有CMakeFiles 的資料夾我們可以進去裡面找到有 link等等的資料夾進行對 一些編譯參數做更改,我加了參數 -pg
也就是我們可以透過下pg參數進行 gprof 流程圖繪製 https://github.com/grievejia/andersen/blob/master/unittest/AndersTest.cpp 直接 去下gprof 繪製流程圖可以發現超級大
gprof ./AndersTest gmon.out >> app_gprof_data.txt

gprof2dot -w -s app_gprof_data.txt > app_call_graph.dot

dot -T png  app_call_graph.dot -o app_call_graph.png

超級大!,因為裡面混用了我們google test 框架的東西,我們抽起來
修改過後AndersTest.cpp
#include "NodeFactory.h"
#include "PtsSet.h"
#include "SparseBitVectorGraph.h"

#include "llvm/Analysis/CFG.h"
#include "llvm/AsmParser/Parser.h"
#include "llvm/IR/Function.h"
#include "llvm/IR/InstIterator.h"
#include "llvm/IR/LLVMContext.h"
#include "llvm/IR/Module.h"
#include "llvm/IR/PassManager.h"
#include "llvm/Pass.h"
#include "llvm/Support/ErrorHandling.h"
#include "llvm/Support/SourceMgr.h"
#include "llvm/Support/raw_ostream.h"
#include "gtest/gtest.h"
#include <iostream>
#include <memory>
#include <time.h>
using namespace std;
using namespace llvm;

int main(){
  clock_t start, end;
  double cpu_time_used;
  start = clock();
  AndersNodeFactory factory;

  auto n0 = factory.createValueNode();
  auto n1 = factory.createValueNode();
  auto n2 = factory.createValueNode();
  auto n3 = factory.createValueNode();
  auto n4 = factory.createValueNode();
  factory.mergeNode(n0, n1);
  for (int i = 0 ; i  < 1000000000 ; i++){
    factory.mergeNode(n0, n1);
  }
  end = clock();
  cpu_time_used = ((double) (end - start)) / CLOCKS_PER_SEC;

  factory.dumpRepInfo();
  cout << "time : " <<  cpu_time_used <<endl;
    return 0;
}
在我們抽離我們的google test 框架後,我們引入了最土炮的 clock 測速度法,但是我們可以用其他工具,vture進行分析,額外提到一點 -pg 可能導致我們程式執行速度變慢非常多。
那麼我們進過各種組合得到的大致結論, 兩種compile -O0 -O3 組合有8種組合,最後在 以ICPC LIB LINK GNU COMPILER 發生出錯
抽取後我們以我們執行插入節點 1000000000 次簡單速度來檢測factory.mergeNode
執行結果
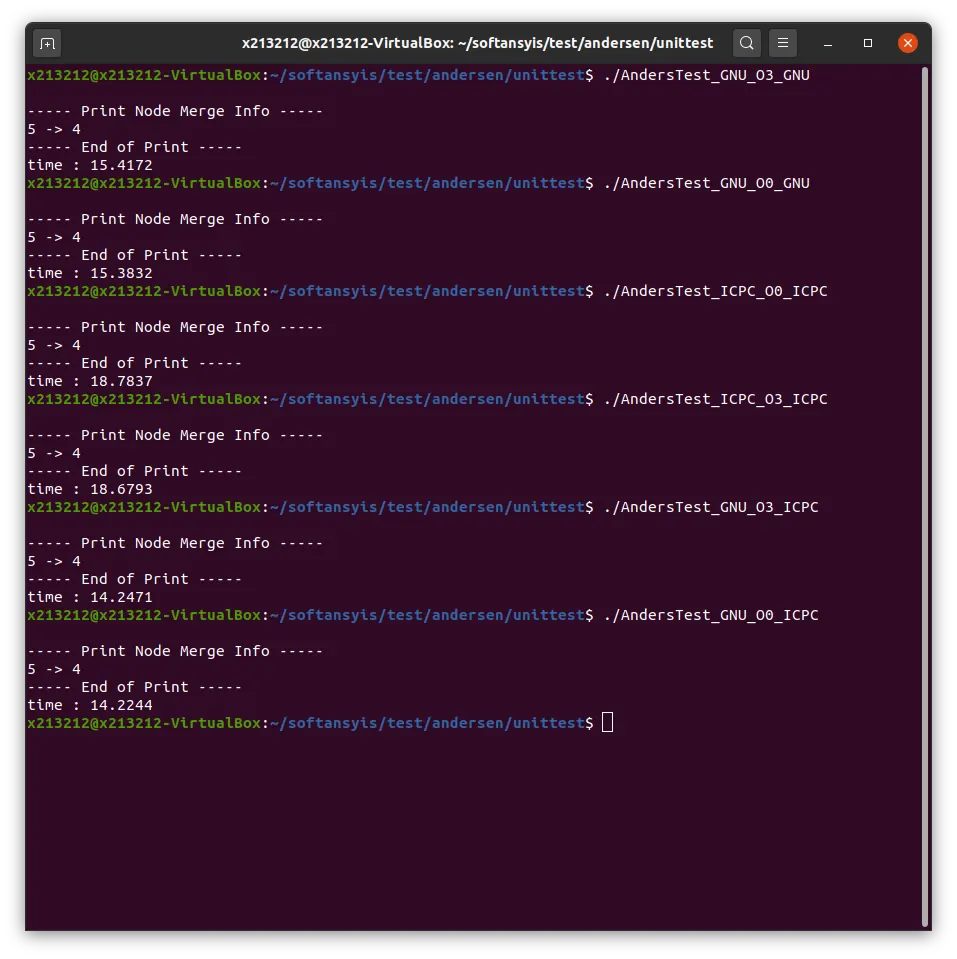
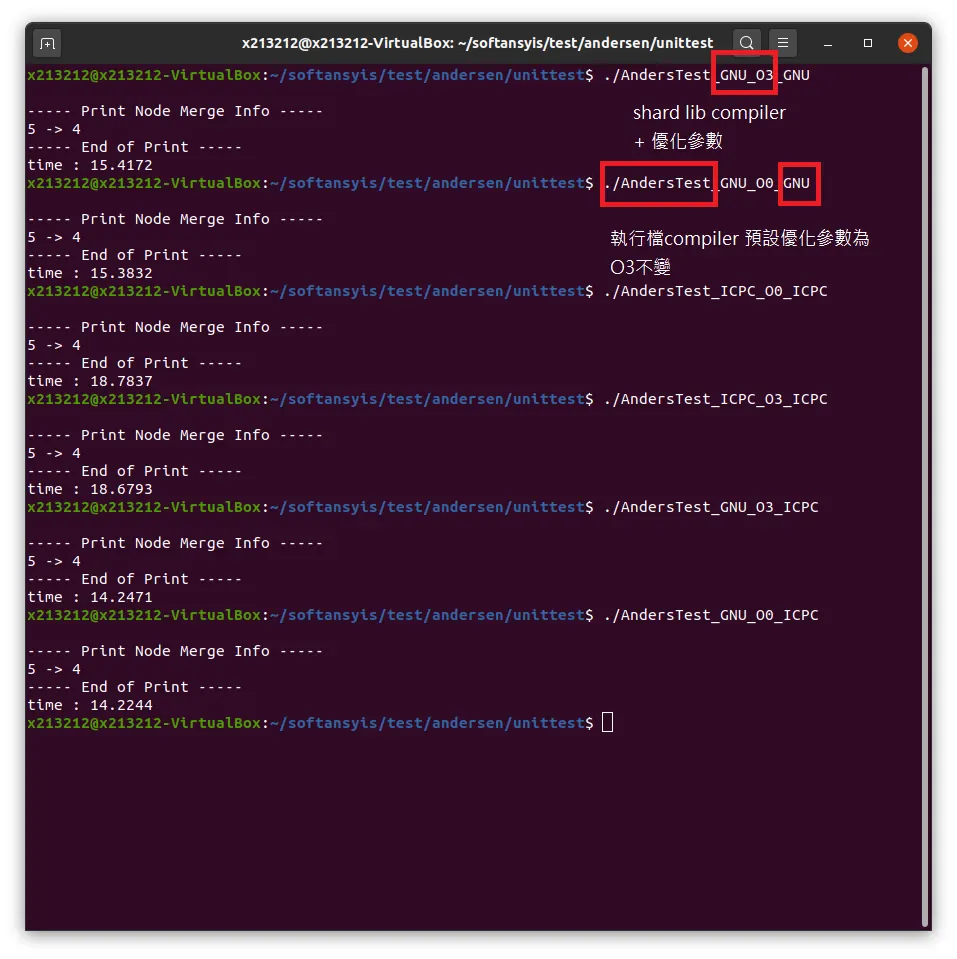 可以看到gnu compiler 編譯的 lib
配 icpc compiler 執行檔速度最快,我們可以透過gprof 參數 -a 去看看有什麼差別
可以看到gnu compiler 編譯的 lib
配 icpc compiler 執行檔速度最快,我們可以透過gprof 參數 -a 去看看有什麼差別
gprof -a ./AndersTest gmon.out >> app_gprof_data.txt
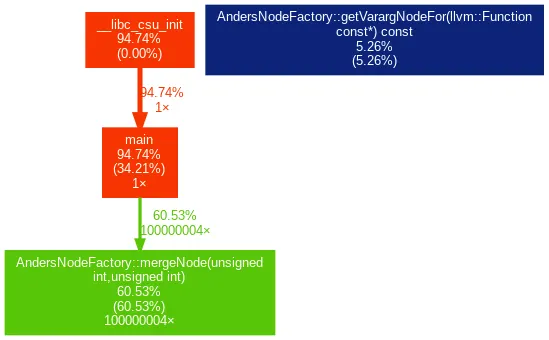
gprof ./AndersTest gmon.out >> app_gprof_data.txt
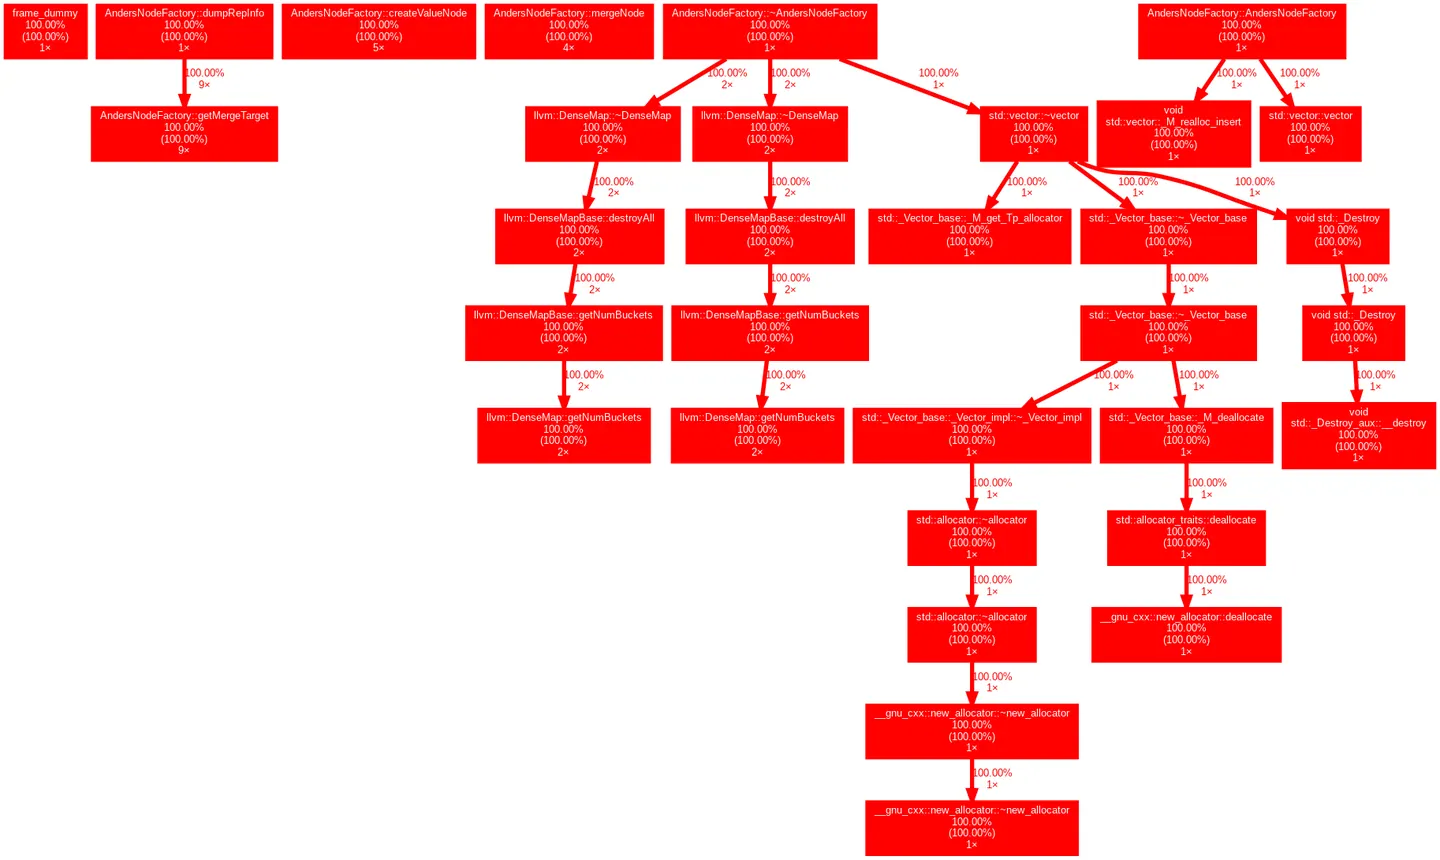
可以看到我們可以快速的去看出一個整個專案的結構等等, 到這裡假設要自行作分析一個專案大致上是沒問題了!,當然這個在後續製作論文上也有很大的幫助 llvm pass!
Comments